
Introduction #
In today’s digital age, securing web traffic with HTTPS is crucial for protecting data integrity and privacy. This guide demonstrates how to leverage Nginx, a powerful web server, within Docker Compose to create a secure and scalable environment.
Note: This guide will make use of self-signed certificates. While they provide a layer of security, they are not trusted by default by web browsers and users. For production environments, it’s recommended to use certificates issued by a trusted Certificate Authority such as https://letsencrypt.org/ which is free to use!
Prerequisites #
In the following, it is assumed that Docker with the Docker Compose plugin is installed on your system.
You can check if they are both installed via:
~# docker --version
Docker version 28.0.1, build 068a01e

~# docker compose version
Docker Compose version v2.33.1
Further on would be ideal if basic understanding of Nginx and SSL certificates exist.
Docker Compose #
Create docker-compose.yml, change the outgoing port if needed.
version: '3.8'
services:
  nginx:
    image: nginx:latest
    ## Either use host network mode or uncomment the following line
    #ports:
    #  - "8080:8080"
    volumes:
      - ./nginx.conf:/etc/nginx/nginx.conf
      - ./certs:/etc/nginx/certs
      # Uncomment the following line if you want to use password protection
      # - ./auth:/etc/nginx/auth
    restart: always
    network_mode: host
Create nginx.conf #
Create nginx.conf, change the internal ip and internal port. Optionally change the external port and server name.
## Do not forget to add this events block, otherwise you will get an error

events {}

http {

    server {
        listen 8080 ssl;
        http2  on;
        ## Change this server name to your domain name
        server_name your_domain.com;

        ssl_certificate     /etc/nginx/certs/nginx.crt;
        ssl_certificate_key /etc/nginx/certs/nginx.key;

        location / {
            proxy_pass http://<INTERNAL_IP>:<INTERNAL_PORT>;
            proxy_set_header Host $host;
            proxy_set_header X-Real-IP $remote_addr;
            proxy_set_header X-Forwarded-For $proxy_add_x_forwarded_for;
            proxy_set_header X-Forwarded-Proto $scheme;
        }
    }
}
Create certs #
Here we create a self-signed certificate, which will be used for HTTPS.
Self-signed certificates are digital certificates that are not issued by a trusted certificate authority but are generated and signed by the users themselves. They are commonly used in development environments for testing and development purposes.
mkdir -p certs
openssl req -x509 -nodes -days 365 -newkey rsa:2048 -keyout ./certs/nginx.key -out ./certs/nginx.crt
Start Docker Compose #
Start docker-compose
docker compose up -d
You should be able to access your service now on https://NGINX_IP:8080 .
Certificate not trusted error #
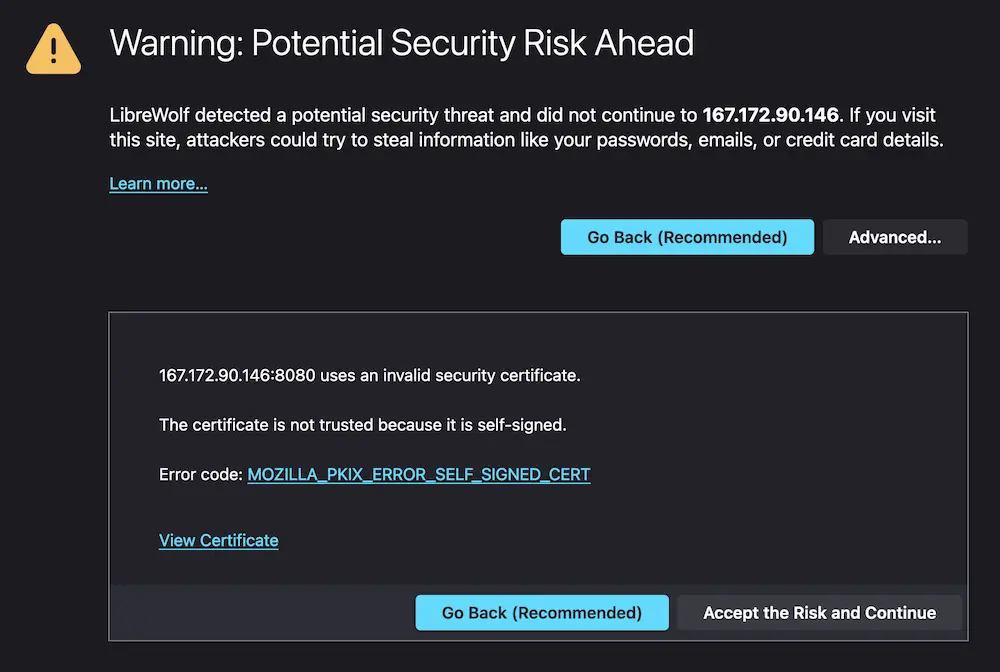
If you encounter a ‘certificate not trusted’ error in your browser, this is expected with self-signed certificates. To resolve this, you can add an exception in your browser settings.
Password protection #
Update docker-compose.yml #
version: '3.8'
services:
  nginx:
    image: nginx:latest
    ## Either use host network mode or uncomment the following line
    #ports:
    #  - "8080:8080"
    volumes:
      - ./nginx.conf:/etc/nginx/nginx.conf
      - ./certs:/etc/nginx/certs
      - ./auth:/etc/nginx/auth
    restart: always
    network_mode: host
Create .htpasswd #
Create .htpasswd, htpasswd will require you to enter a password.
mkdir -p auth
htpasswd -c ./auth/.htpasswd <USERNAME>
Update nginx.conf #
Change nginx.conf and add the following to the location block
auth_basic "Restricted Access";
auth_basic_user_file /etc/nginx/auth/.htpasswd;
So that it looks like this:
http {

    server {
        listen 8080 ssl http2;
        server_name your_domain.com;

        ssl_certificate     /etc/nginx/certs/nginx.crt;
        ssl_certificate_key /etc/nginx/certs/nginx.key;

        location / {
            auth_basic "Restricted Access";
            auth_basic_user_file /etc/nginx/auth/.htpasswd;

            proxy_pass http://<INTERNAL_IP>:<INTERNAL_PORT>;
            proxy_set_header Host $host;
            proxy_set_header X-Real-IP $remote_addr;
            proxy_set_header X-Forwarded-For $proxy_add_x_forwarded_for;
            proxy_set_header X-Forwarded-Proto $scheme;
        }
    }
}
Restart Docker Compose #
docker compose down && docker compose up -d
You should be able to access your service now on https://NGINX_IP:8080 , given that you enter the correct username and password.
Conclusion #
Congratulations on setting up your Nginx server with HTTPS in Docker Compose! As next steps, consider exploring more advanced Nginx configurations or looking into using certificates from trusted authorities.